2013年5月23日木曜日

Python Pyramid + Raspberry Pi PWM つづき

前回作成した Raspberry Pi に Python Pyramid のウェブアプリをのせて、ウェブアプリから PWM の設定を行うというアプリの2回目。
今回は、そのウェブアプリにログインページを追加する。

  1. __init__.py
    auth なんとか、というのがいくつか追加されている。
    login/logout の config.add_route も追加。
    #!/usr/bin/env python
    # coding: UTF-8
    from pyramid.config import Configurator
    from pyramid.session import UnencryptedCookieSessionFactoryConfig
    from pyramid.authentication import AuthTktAuthenticationPolicy
    from pyramid.authorization import ACLAuthorizationPolicy
    from sqlalchemy import engine_from_config
    from pypwm.security import groupfinder
    
    from .models import (
        DBSession,
        Base,
        )
    
    my_session_factory = UnencryptedCookieSessionFactoryConfig('something_so_secret_strings')
    
    def main(global_config, **settings):
        """ This function returns a Pyramid WSGI application.
        """
        engine = engine_from_config(settings, 'sqlalchemy.')
        DBSession.configure(bind=engine)
        Base.metadata.bind = engine
        authn_policy = AuthTktAuthenticationPolicy(
            'sosecret', callback=groupfinder, hashalg='sha512')
        authz_policy = ACLAuthorizationPolicy()
        config = Configurator(settings=settings, root_factory='pypwm.models.RootFactory',
                              session_factory=my_session_factory)
        config.set_authentication_policy(authn_policy)
        config.set_authorization_policy(authz_policy)
        config.add_static_view('static', 'static', cache_max_age=3600)
        config.add_route('home', '/')
        config.add_route('home_org', '/home_org')
        config.add_route('update_slider_pwm', '/update_slider_pwm')
        config.add_route('login', '/login')
        config.add_route('logout', '/logout')
        config.add_renderer(".html", "pyramid.mako_templating.renderer_factory")  
        config.scan()
        return config.make_wsgi_app()
    

  2. models.py
    User と RootFactory Class が追加されている。
    #!/usr/bin/env python
    # coding: UTF-8
    from pyramid.security import (
        Allow,
        Everyone,
        )
    
    from sqlalchemy import (
        Column,
        Integer,
        Text,
        )
    
    from sqlalchemy.ext.declarative import declarative_base
    
    from sqlalchemy.orm import (
        scoped_session,
        sessionmaker,
        )
    
    from zope.sqlalchemy import ZopeTransactionExtension
    
    DBSession = scoped_session(sessionmaker(extension=ZopeTransactionExtension()))
    Base = declarative_base()
    
    
    class MyModel(Base):
        __tablename__ = 'models'
        id = Column(Integer, primary_key=True)
        name = Column(Text, unique=True)
        value = Column(Integer)
    
        def __init__(self, name, value):
            self.name = name
            self.value = value
    
    
    class User(Base):
        """ The SQLAlchemy declarative model class for a User object. """
        __tablename__ = 'users'
        id = Column(Integer, primary_key=True)
        name = Column(Text, unique=True)
        password = Column(Text)
    
        def __init__(self, name, password):
            self.name = name
            self.password = password
    
    class RootFactory(object):
        __acl__ = [ (Allow, Everyone, 'view'),
                    (Allow, 'group:editors', 'edit') ]
        def __init__(self, request):
            pass
    

  3. security.py
    これは新規に追加。ほんとうは、ここでデーターベースを参照してそれなりの値を返す?
    今回は、ログインID が user 、パスワードが password にしている。
    #!/usr/bin/env python
    # coding: UTF-8
    USERS = {
             'user': 'password',
             }
    GROUPS = {
              'user':['group:editors']
              }
    
    def groupfinder(userid, request):
        if userid in USERS:
            return GROUPS.get(userid, [])
    

  4. views.py
    import の追加・修正、login/logout 処理の追加。
    そして、@view_config に permission='edit' を追加している。これだけで、この関数にセッション管理などの必要な処理が追加される。
    #!/usr/bin/env python
    # coding: UTF-8
    from pyramid.httpexceptions import HTTPFound
    from pyramid.response import Response
    from pyramid.view import (
        view_config,
        forbidden_view_config,
        )
    
    from sqlalchemy.exc import DBAPIError
    
    from .models import (
        DBSession,
        MyModel,
        User,
        )
    
    from pyramid.security import (
        remember,
        forget,
        authenticated_userid,
        )
    
    from .security import USERS
    
    import time, string, os
    os_name = os.uname()
    if os_name[0] == 'Darwin':
        fname = '/Users/pi/env_pwm/PyPWM/pypwm/pwm.prefs'
    elif os_name[0] == 'Linux':
        fname = '/home/pi/env_pwm/PyPWM/pypwm/pwm.prefs'
    
    @view_config(route_name='home_org', renderer='templates/mytemplate.pt')
    def my_view(request):
        try:
            one = DBSession.query(MyModel).filter(MyModel.name == 'one').first()
        except DBAPIError:
            return Response(conn_err_msg, content_type='text/plain', status_int=500)
        return {'one': one, 'project': 'PyPWM'}
    
    conn_err_msg = """\
    Pyramid is having a problem using your SQL database.  The problem
    might be caused by one of the following things:
    
    1.  You may need to run the "initialize_PyPWM_db" script
        to initialize your database tables.  Check your virtual 
        environment's "bin" directory for this script and try to run it.
    
    2.  Your database server may not be running.  Check that the
        database server referred to by the "sqlalchemy.url" setting in
        your "development.ini" file is running.
    
    After you fix the problem, please restart the Pyramid application to
    try it again.
    """
    
    
    #---- pwm
    @view_config(route_name='home', renderer='index.html', permission='edit')
    def home(request):
        pwm_dict = {}
        pwm_val = read_prefs()
        pwm_dict['pwm_val'] = pwm_val
        return dict(pwm_dict=pwm_dict)
    
    
    @view_config(route_name='update_slider_pwm', xhr=True, renderer='json', permission='edit')
    def update_slider_pwm(request):
        """
        This function is call from ajax_slider_pwm.js send_option_request when slider is updated.
        receive json pwm data by ajax
                "pwm_val": slider_val,
                "channel": channel,
                "command": command
        command is 'read' or 'write'
        """
        pwm_val = request.GET.get('pwm_val')
        pwm_val = to_int(pwm_val)
        channel = request.GET.get('channel')
        channel = to_int(channel)
        command = request.GET.get('command')
        if command == 'read':
            pwm_val = read_prefs()
        elif command == 'write':
            write_prefs(pwm_val)
        return {
            'pwm_val': pwm_val,
            'channel': channel,
            'command': command,
        }
    
    
    def read_prefs():
        kMinVal = 0
        kMaxVal = 1999
        pwm_val = 0
    
        fd = None
        try:
            fd = open(fname, 'r')
        except IOError:
            fd = None
        if fd is not None:
            line = fd.readline()
            pwm_val = string.strip(line)
            try:
                pwm_val = int(pwm_val)
            except ValueError:
                pwm_val = 0
            if pwm_val < kMinVal:
                pwm_val = kMinVal
            if pwm_val > kMaxVal:
                pwm_val = kMaxVal
            fd.close()
        return pwm_val
    
    
    def write_prefs(pwm_val):
        my_error_count = 0
        fin = False
        while (not fin):
            try:
                fd = open(fname, 'w')
            except IOError:
                fd = None
            if fd is not None:
                fd.write(str(pwm_val))
                fd.close()
                fin = True
            else:
                if my_error_count < 10:
                    my_error_count += 1
                    time.sleep(0.1)
                else:
                    fin = True
    
    def to_int(the_str):
        try:
            int_value = int(the_str)
        except:
            int_value = 0
        return int_value
    
    
    #---- login/logout
    @view_config(route_name='login', renderer='login.html')
    @forbidden_view_config(renderer='login.html')
    def login(request):
        login_url = request.route_url('login')
        referrer = request.url
        if referrer == login_url:
            referrer = '/' # never use the login form itself as came_from
        came_from = request.params.get('came_from', referrer)
        message = ''
        login = ''
        password = ''
        if 'form.submitted' in request.params:
            login = request.params['login']
            password = request.params['password']
            if USERS.get(login) == password:
                headers = remember(request, login)
                return HTTPFound(location = came_from,
                                 headers = headers)
            message = 'Failed login'
    
        return dict(
            message = message,
            url = request.application_url + '/login',
            came_from = came_from,
            login = login,
            password = password,
            )
    
    @view_config(route_name='logout')
    def logout(request):
        headers = forget(request)
        return HTTPFound(location = request.route_url('home'), headers = headers)
    

  5. templates/login.html
    新規追加。
    ## for mako
    <!DOCTYPE html>
    <html>
    <head>
      <title>PyPWM Login</title>
      <meta charset="utf-8">
      <meta name="viewport" content="width=device-width, initial-scale=1.0, maximum-scale=1.0, user-scalable=no" />
      <meta name="apple-mobile-web-app-capable" content="yes" />  
      <meta name="keywords" content="python web application" />
      <meta name="description" content="pyramid web application" />
      <link rel="shortcut icon" href="${request.static_url('pypwm:static/favicon.ico')}" />
      <link rel="stylesheet" href="${request.static_url('pypwm:static/jquery/login.css')}" />
      <script type="text/javascript"></script>
    </head>
    <body>
      <div id="wrap">
        <div id="top-small">
          <div class="top-small align-center">
            <div>
            </div>
          </div>
        </div>
        <div id="middle">
          <div class="middle align-right">
            <div id="left" class="app-welcome align-left">
              <span style="background-color: #FFFF00">${message}</span>
            </div>
            <div id="right" class="app-welcome align-right"></div>
          </div>
        </div>
        <div id="bottom">
          <div class="bottom">
            <form action="${url}" method="post" id="id_login_form">
              <input type="hidden" name="came_from" value="${came_from}" />
              <input type="text" name="login" value="${login}"
                  placeholder="login name" autofocus required/><br/>
              <input type="password" name="password" value="${password}"
                  placeholder="password" required /><br/>
              <input type="submit" name="form.submitted" value="Log In" />
            </form>
          </div>
        </div>
      </div>
      <div id="footer">
        <div class="footer">&copy; Copyright 2013, .</div>
      </div>
    </body>
    </html>
    

  6. login.css
    #id_login_form {
     width: 220px;
     height: 155px;
     position: absolute;
     left: 50%;
     top: 30%;
     margin-left: -110px;
     margin-top: -75px;
    }
    
    #id_login_form input[type="text"],#id_login_form input[type="password"] {
        width: 100%;
        height: 40px;
        margin-top: 7px;
        font-size: 14px;
        color: #444;
        outline: none;  
        background-color: #fff;  
        border-radius: 6px;
        border: 1px solid rgba(0, 0, 0, .49);
    }
      
    /* button */
    #id_login_form input[type="submit"] {
        width: 100%;
        height: 50px;
        margin-top: 7px;
        color: #fff;
        font-size: 18px;
        font-weight: bold;
        outline: none;  
        background-color: #5466da;
        border-radius: 6px;
        border: 1px solid rgba(0, 0, 0, .49);
    }
      
    #id_login_form input[type="submit"]:active {
        background-color: #7588e1;
    }
    

Python Pyramid + Raspberry Pi PWM

Raspberry Pi に Python Pyramid のウェブアプリをのせて、ウェブアプリから PWM の設定を行うというアプリをつくる。
まず、Mac 上に Pyramid の環境を作って、そこで動作の確認を行う。
次のインストールは Raspberry Pi 上ではなく、Mac に構築している。
できあがってから、ソースを Raspberry Pi へ移動することにする。

作成するのは、PWM 制御のウェブアプリ。
ウェブでスライダーを表示して、PWM のパルス幅を制御する。
実際に PWM の制御をするのは root 権限が必要なので、ウェブアプリとは別の Python アプリとする。
二つのアプリ間での情報伝達はテキストファイルにする。
  1. Pyramidのインストール
    virtualenvで環境を作って、そこにPyramidをインストールする。
    virtualenv と virtualenvwrapper をすでにインストールしてある場合は、3行目の env_pwm をつくるところから。
    $ sudo pip install virtualenv
    $ sudo pip install virtualenvwrapper
    $ virtualenv --no-site-packages env_pwm
    $ cd env_pwm
    $ bin/pip install pyramid
    

  2. pwm という名前の Pyramid Project の作成
    最終的に、ログインパスワードを入力させてからページを表示したいので、starter ではなく、alchemy とします。
    $ bin/pcreate -s alchemy PyPWM
    

  3. つくった PyPWM プロジェクトを動かしてみる
    setup.py は必要なモジュールを自動的にインストールするので、実行を終了するまで時間がかかる場合があります。
    $ cd PyPWM
    $ ../bin/python setup.py develop
    $ ../bin/python setup.py test -q
    $ ../bin/pserve development.ini
    

    ここで、localhost:6543 を見に行くとエラーが表示されています。
    こんな感じ。
    Pyramid is having a problem using your SQL database.  The problem
    might be caused by one of the following things:
    

    これをやれ、ということで・・・。
    $ ../bin/initialize_PyPWM_db development.ini
    

    もう一度・・・。
    $ ../bin/pserve development.ini
    

    で、localhost:6543 を見に行くと、今度はちゃんと表示されています。
    この段階のプロジェクトを bitbucket にあげておきます。

    ついでに wsgi の設定もしてしまいます。
    Mac の場合は/etc/apache2/other の modwsgi.conf をこのようにします。
    WSGIApplicationGroup %{GLOBAL}
    WSGIPassAuthorization On
    WSGIDaemonProcess pyramid user=snaf group=staff threads=4 \
       python-path=/Users/pi/env_pwm/lib/python2.7/site-packages
    WSGIScriptAlias /pwm /Users/pi/env_pwm/pyramid.wsgi
    
    <directory env_pwm="" pi="" sers="">
      WSGIProcessGroup pyramid
      Order allow,deny
      Allow from all
    </directory>
    

    /Users/pi/env_pwm/pyramid.wsgi はこう。
    from pyramid.paster import get_app, setup_logging
    ini_path = '/Users/pi/env_pwm/PyPWM/production.ini'
    setup_logging(ini_path)
    application = get_app(ini_path, 'main')
    

    これで、Mac 上の localhost/pwm で PyPWM のページが表示されます。

    Raspberry Pi の wsgi も設定変更しておきます。
    /home/pi/env_pwm/pyramid.wsgi
    from pyramid.paster import get_app, setup_logging
    ini_path = '/home/pi/env_pwm/PyPWM/production.ini'
    setup_logging(ini_path)
    application = get_app(ini_path, 'main')
    

    /etc/apache2/mods-available/wsgi.conf の最後の方に追加したもの。
    WSGIApplicationGroup %{GLOBAL}
    WSGIPassAuthorization On
    WSGIDaemonProcess pyramid user=pi group=pi threads=4 \
       python-path=/home/pi/env_pwm/lib/python2.7/site-packages
    WSGIScriptAlias /pwm /home/pi/env_pwm/pyramid.wsgi
    
    <Directory /home/pi/env_pwm>
      WSGIProcessGroup pyramid
      Order allow,deny
      Allow from all
    </Directory>
    

  4. 忘れずに Raspberry Pi に mercurial をインストールしておく
    Mac で作成したプロジェクトを Bitbucket にあげておいて、Raspberry Pi 側でそれを持ってこようと言う考え。hg ではなくて git をお使いの方はそちらをどうぞ。
    $ sudo apt-get install mercurial
    

    Raspberry Pi 側では、clone する前に Mac でやったのと同じように Python の仮想環境を作って Pyramid をインストールし、 PyPWM プロジェクトをつくって実行してみる、というところまではやっておく必要があります。

  5. Mac 上の Eclipse で Pyramid の PyPWM プロジェクトを作成したディレクトリに、同じ名前で Eclipse のプロジェクトを作成
  6. Python へのパスは、その仮想環境の Python とします。env_pwm/bin/python です。
    Python Pyramid で「Eclipseを使う」を参照してください。

  7. development.ini の修正
    「sqlalchemy.url = sqlite:///...」の上に、これを追加する。
    development.ini だけではなく、production.ini にも追加しておく。
    # mako template settings
    mako.directories = pypwm:templates
    

    file log の設定を handlers と logger_root に追加する。handler_filelog も追加する。
    [handlers]
    keys = console, filelog
    
    [logger_root]
    level = INFO
    handlers = console, filelog
    
    [handler_filelog]
    class = FileHandler
    args = ('%(here)s/pypwm.log','a')
    level = NOTSET
    formatter = generic
    

    古い jQuery を読み込もうとするので、pyramid_debugtoolbar をコメントアウトする。

  8. pypwm/views.py の修正
    念のためにこれを最初に置く。
    #!/usr/bin/env python
    # coding: UTF-8
    

    Mac OS X と Raspberry Pi の切り替えのためにこれを追加する。初期設定ファイルの場所。
    import os
    os_name = os.uname()
    if os_name[0] == 'Darwin':
        fname = '/Users/pi/env_pwm/PyPWM/pypwm/pwm.prefs'
    elif os_name[0] == 'Linux':
        fname = '/home/pi/env_pwm/PyPWM/pypwm/pwm.prefs'

  9. pypwm/__init__.py の修正
    main() にadd_router と add_renderer を追加する。
    add_renderer は、こうすることで、mako テンプレートの拡張子を html とすることができるようになる。
    def main(global_config, **settings):
        """ This function returns a Pyramid WSGI application.
        """
        engine = engine_from_config(settings, 'sqlalchemy.')
        DBSession.configure(bind=engine)
        Base.metadata.bind = engine
        config = Configurator(settings=settings)
        config.add_static_view('static', 'static', cache_max_age=3600)
        config.add_route('home', '/')
        config.add_route('home_org', '/home_org')
        config.add_route('pypwm', '/pypwm')
        config.add_route('update_slider_pwm', '/pypwm/update_slider_pwm')
        config.add_renderer(".html", "pyramid.mako_templating.renderer_factory")  
        config.scan()
        return config.make_wsgi_app()
    
  10. ひとつひとつは大変なので
    こんな感じにファイルを置きます。
    jQuery Mobile を使うので、関連ファイルをstatic ディレクトリに置いてあります。
    ほかには、templates/ に index.html があります。


  11. py_pwm.py
    8 ch 分になっているが、web アプリ側は 1 ch のみ。
    #!/usr/bin/env python
    # coding: UTF-8
    
    """
    py_pwm.py
    
    RPIO を使うので、py_pwm.py は root 権限で実行する必要がある。
    crontab で起動時に立ち上がるように設定しておく。
    prefs を 0.1 秒ごとに読んで、更新されていれば、PWM の値をその値で更新する。
    prefs が無ければ、0% の出力とする。
    prefs は、web アプリ側で作成および書き込みを行う。
    prefs の値は ch0 から ch7 までの8つの値を「,」(カンマ)で区切って並べたものとする。
    prefs に書き込まれている値は、0から 1999 までの整数値とする。
    prefs に書き込まれている値を10倍したマイクロ秒の値がパルス幅となる。
    prefs の場所はパラメタで指定する。
    
    @reboot /home/pi/env_pwm/PyPWM/run_as_root/py_pwm.py /home/pi/env_pwm/PyPWM/pypwm/pwm.prefs
    """
    import sys, string, time, os
    os_name = os.uname()
    if os_name[0] == 'Darwin':
        pass
    elif os_name[0] == 'Linux':
        if os_name[1] == 'raspberrypi':
            from RPIO import PWM
    
    class PyPwm():
        my_debug = False
        kChNum = 8
        kMinVal = 0
        kMaxVal = 1999
        prefs = 'pwm.prefs'
        pwm_vals = []
        pwm_out = None
        pwm_init  = [ 0,  0,  0,  0,  0,  0,  0,  0]
        pwm_gpios = [17, 18, 27, 22, 23, 24, 25,  4]
        pwm_pins  = [11, 12, 13, 15, 16, 18, 22,  7]
        prev_vals = [ 0,  0,  0,  0,  0,  0,  0,  0]
        
        def __init__(self, prefs):
            self.prefs = prefs
            for ii in range(self.kChNum):
                init = self.pwm_init[ii]
                self.pwm_vals.append(init)
            if os_name[0] == 'Linux':
                self.pwm_out = PWM.Servo()
        
        
        def read_prefs(self):
            fd = None
            try:
                fd = open(self.prefs, 'r')
            except IOError:
                fd = None
            if fd is not None:
                line = fd.readline()
                
                if self.my_debug:
                    print ("read_prefs: %s" % (line))
                    
                items = line.split(',')
                ii = 0
                for item in items:
                    item = string.strip(item)
                    if ii < self.kChNum:
                        try:
                            item = int(item)
                        except ValueError:
                            item = 0
                        if item < self.kMinVal:
                            item = self.kMinVal
                        if item > self.kMaxVal:
                            item = self.kMaxVal
                        self.pwm_vals[ii] = item
                    ii += 1
                
            
        def main(self):        
            self.read_prefs()
            
            if self.my_debug:
                for item in self.pwm_vals:
                    print item
            
            while True:
                for ii in range(self.kChNum):
                    gpio = self.pwm_gpios[ii]
                    val = self.pwm_vals[ii]
                    val *= 10
                    if val != self.prev_vals[ii]:
                        self.prev_vals[ii] = val
                        if self.pwm_out is not None:
                            if val > 0:
                                self.pwm_out.set_servo(gpio, val)
                                if self.my_debug:
                                    print "set_servo gpio = %2d, %5d" % (gpio, val)
                            elif val == 0:
                                self.pwm_out.stop_servo(gpio)
                                if self.my_debug:
                                    print "stop_servo gpio = %2d" % (gpio)
                time.sleep(0.1)
                self.read_prefs()


    if __name__ == '__main__':
        argv = sys.argv
        argc = len(argv)
        if argc >= 2:
            fname = argv[1]
        else:
            fname = 'pwm.prefs'
        
        py_pwm = PyPwm(fname)
        py_pwm.main()
    

  12. ajax_slider_pwm.js
    // # coding: UTF-8
    // ajax_slider_pwm.js
    
    function onchange_slider_pwm() {
     onchange_slider_sub(1, '#slider_pwm');
    }
    
    function onchange_slider_sub(channel, slider_id) {
     var slider_val = jQuery(slider_id).val();
     send_option_request(slider_val, channel, 'write');
    }
    
    function send_option_request(slider_val, channel, command) {
     // command is 'read' or 'write'
        $("#id_loading").text("Loading...");
     var the_url = "update_slider_pwm";
     if (window.location.pathname != "/") {
      the_url = window.location.pathname + "/" + the_url;
     }
     // alert("the_url = " + the_url);
        $("#id_debug").empty();
        $.ajax({
            dataType: "json",
            data: {
                "pwm_val": slider_val,
                "channel": channel,
                "command": command
            },
            cache: true,
            url: the_url,
            type: "get",
            success: function (data, dataType) {
                // alert("success: " + data);
                resp_pwm = rcv_response(data); // resp has channel and pwm_val
                $("#id_loading").empty();
                if (command == "read") {
                 var slider_id = "#slider_" + resp_pwm.channel
                 jQuery(slider_id).val(resp_pwm.pwm_val);
                 $("#id_debug").text(resp_pwm.pwm_val)
                }
            },
            error: function(XMLHttpRequest, textStatus, errorThrown) {
                $("#id_debug").text("ajax error");
            }
        });
    }   // function send_option_request(which, key)
    
    
    function rcv_response(jd) {
     resp_pwm = {pwm_val:jd.pwm, channel:jd.channel, command:jd.command};
     return resp_pwm;
    }   // function rcv_option_response()

  13. index.html
    ## for maco
    <!DOCTYPE html>
    <html>
    <head>
      <title>PyPWM</title>
      <meta charset="utf-8">
      <meta name="viewport" content="width=device-width, initial-scale=1.0, maximum-scale=1.0, user-scalable=no" />
      <meta name="apple-mobile-web-app-capable" content="yes" />  
      <meta name="keywords" content="python web application" />
      <meta name="description" content="pyramid web application" />
      <link rel="shortcut icon" href="${request.static_url('pypwm:static/favicon.ico')}" />
      <link rel="stylesheet" href="${request.static_url('pypwm:static/jquery/jquery.mobile-1.3.1.min.css')}" />
      <link rel="stylesheet" href="${request.static_url('pypwm:static/jquery/slider.css')}" />
      <script src="${request.static_url('pypwm:static/jquery/ajax_slider_pwm.js')}"></script>
      <script src="${request.static_url('pypwm:static/jquery/jquery-1.9.1.min.js')}"></script>
      <script src="${request.static_url('pypwm:static/jquery/jquery.mobile-1.3.1.min.js')}"></script>
      <style type="text/css"></style>
    </head>
    <body>
    
    <form action="${request.route_url('home')}" method="post">
    <div id="slider">
      <label for="slider_pwm">PWM:</label>
      <input type="range" name="slider_pwm" id="slider_pwm" value="${pwm_dict['pwm_val']}" min="0" max="1999" step="1" onchange="onchange_slider_pwm()" />
    </div>
    </form>
    
    <div id="id_loading"></div>
    <div id="id_debug"></div>
    </body>
    </html>

  14. __init__.py
    from pyramid.config import Configurator
    from sqlalchemy import engine_from_config
    
    from .models import (
        DBSession,
        Base,
        )
    
    
    def main(global_config, **settings):
        """ This function returns a Pyramid WSGI application.
        """
        engine = engine_from_config(settings, 'sqlalchemy.')
        DBSession.configure(bind=engine)
        Base.metadata.bind = engine
        config = Configurator(settings=settings)
        config.add_static_view('static', 'static', cache_max_age=3600)
        config.add_route('home', '/')
        config.add_route('home_org', '/home_org')
        config.add_route('update_slider_pwm', '/update_slider_pwm')
        config.add_renderer(".html", "pyramid.mako_templating.renderer_factory")  
        config.scan()
        return config.make_wsgi_app()
    

  15. view.py
    #!/usr/bin/env python
    # coding: UTF-8
    from pyramid.response import Response
    from pyramid.view import view_config
    
    from sqlalchemy.exc import DBAPIError
    
    from .models import (
        DBSession,
        MyModel,
        )
    
    import time, string, os
    os_name = os.uname()
    if os_name[0] == 'Darwin':
        fname = '/Users/pi/env_pwm/PyPWM/pypwm/pwm.prefs'
    elif os_name[0] == 'Linux':
        fname = '/home/pi/env_pwm/PyPWM/pypwm/pwm.prefs'
    
    @view_config(route_name='home_org', renderer='templates/mytemplate.pt')
    def my_view(request):
        try:
            one = DBSession.query(MyModel).filter(MyModel.name == 'one').first()
        except DBAPIError:
            return Response(conn_err_msg, content_type='text/plain', status_int=500)
        return {'one': one, 'project': 'PyPWM'}
    
    conn_err_msg = """\
    Pyramid is having a problem using your SQL database.  The problem
    might be caused by one of the following things:
    
    1.  You may need to run the "initialize_PyPWM_db" script
        to initialize your database tables.  Check your virtual 
        environment's "bin" directory for this script and try to run it.
    
    2.  Your database server may not be running.  Check that the
        database server referred to by the "sqlalchemy.url" setting in
        your "development.ini" file is running.
    
    After you fix the problem, please restart the Pyramid application to
    try it again.
    """
    
    
    #---- pwm
    @view_config(route_name='home', renderer='index.html')
    def home(request):
        pwm_dict = {}
        pwm_val = read_prefs()
        pwm_dict['pwm_val'] = pwm_val
        return dict(pwm_dict=pwm_dict)
    
    
    @view_config(route_name='update_slider_pwm', xhr=True, renderer='json')
    def update_slider_pwm(request):
        """
        This function is call from ajax_slider_pwm.js send_option_request when slider is updated.
        receive json pwm data by ajax
                "pwm_val": slider_val,
                "channel": channel,
                "command": command
        command is 'read' or 'write'
        """
        pwm_val = request.GET.get('pwm_val')
        pwm_val = to_int(pwm_val)
        channel = request.GET.get('channel')
        channel = to_int(channel)
        command = request.GET.get('command')
        if command == 'read':
            pwm_val = read_prefs()
        elif command == 'write':
            write_prefs(pwm_val)
        return {
            'pwm_val': pwm_val,
            'channel': channel,
            'command': command,
        }
    
    
    def read_prefs():
        kMinVal = 0
        kMaxVal = 1999
        pwm_val = 0
    
        fd = None
        try:
            fd = open(fname, 'r')
        except IOError:
            fd = None
        if fd is not None:
            line = fd.readline()
            pwm_val = string.strip(line)
            try:
                pwm_val = int(pwm_val)
            except ValueError:
                pwm_val = 0
            if pwm_val < kMinVal:
                pwm_val = kMinVal
            if pwm_val > kMaxVal:
                pwm_val = kMaxVal
            fd.close()
        return pwm_val
    
    
    def write_prefs(pwm_val):
        my_error_count = 0
        fin = False
        while (not fin):
            try:
                fd = open(fname, 'w')
            except IOError:
                fd = None
            if fd is not None:
                fd.write(str(pwm_val))
                fd.close()
                fin = True
            else:
                if my_error_count < 10:
                    my_error_count += 1
                    time.sleep(0.1)
                else:
                    fin = True
    
    def to_int(the_str):
        try:
            int_value = int(the_str)
        except:
            int_value = 0
        return int_value
    

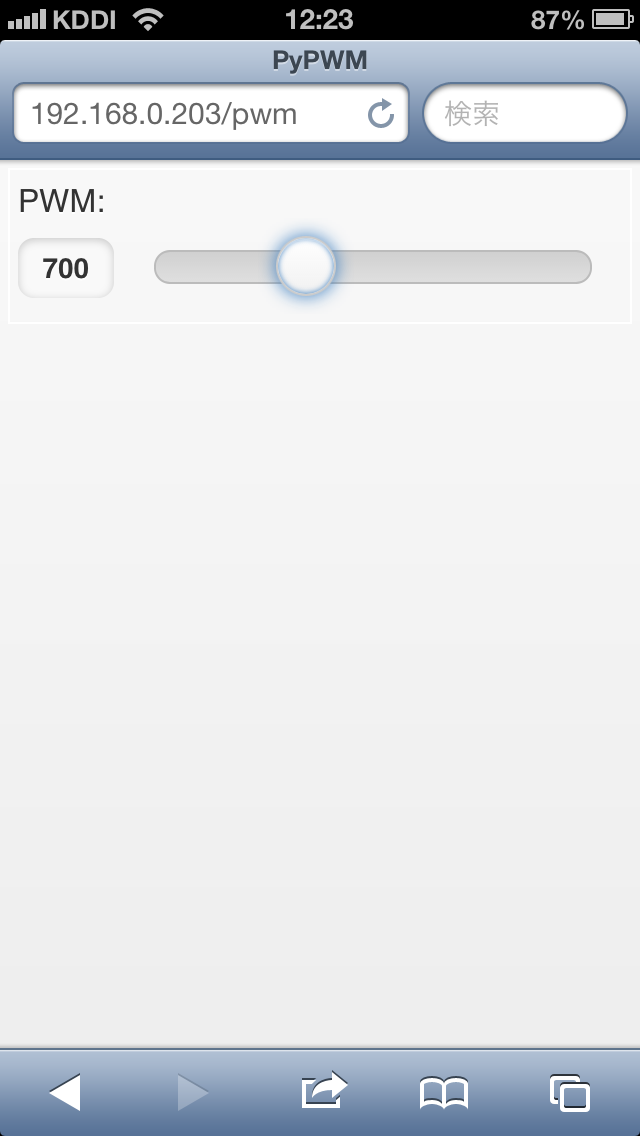
こんな感じで表示される。

2013年5月14日火曜日

pwmの実験

Python 版の WiringPi をインストールしたときに使った WiringPi-Python ディレクトリにサンプルプログラムがあるので、それを実行してみる。
次のディレクトリに移動し、make してから実行する。
これは、Python 版ではなく C のプログラムなので、その実行には root 権限が必要となる。
$ cd WiringPi-Python/WiringPi/examples
$ make pwm
$ sudo ./pwm

ソースを見ればわかるが、enter キーを押すことで、ひとつずつ LED を点灯し、次に enter キーを押すと今度は消していって、最後はすべての LED の明るさを変える。
12個の LED を software pwm により輝度制御を行うサンプルプログラミになっている。

Raspberry Pi はソフトウェアによる PWM 生成の他にハードウェアでも、1ch だけであるが PWM を生成できるようになっている。

ハードウェアによる PWM 生成の例は test2.c だが、「PWM on Raspberry Pi」にもある。
ここに記載されている C のソースコードは、このままでは動かないので、修正したものを次に示す。
修正箇所は、ハードウェアによる生成は「pwmWrite(HARD_PWM_PIN, down);」で、ソフトウェアによる場合は「softPwmWrite(SOFT_PWM_PIN, down);」を使っている。
どちらも pwm のパルス幅を down という変数にしているが、この初期値が設定されていなかった。
変数 down の宣言部分で、このように「int down = kMaxVal;」初期値を設定している。
念のために、この down が0以下なら0、kMaxVal を超えていたら kMaxVal にする if 分も追加している。

//////---------------------------------------------------------------------------
////// Name:                   pwm_hard.c
////// Compiled with:      gcc pwm_hard.c -I/usr/local/include -L/usr/local/lib -lwiringPi -lpthread -o pwm_hard
////// Schematic:              .------.
//////                         | o  o |
//////                     RPi | o  o |12
//////                         | o  o-|-----(->|)-----\/\/\/\--o GND
//////                         | o  o |11    LED1       220
//////                         | o  o-|-----(->|)-----\/\/\/\--o GND
//////                         | o  o |      LED2       220
//////                         | o  o-|
//////
////// Notes:
//////---------------------------------------------------------------------------
#include 
#include 
#include 
#include 
#include 

#define kMaxVal 99
void control_event(int sig);
int HARD_PWM_PIN = 1; //Hardware PWM Pin(GPIO18-12)
int SOFT_PWM_PIN = 0; //Software PWM Pin(GPIO0-11)
int DELAY_MS = 10;
int main(void)
{
  (void)signal(SIGINT, control_event);
  (void)signal (SIGQUIT, control_event);
  printf("Hardware and software based PWM test on LED\n");
  if (getuid() != 0) {
    // wiringPi requires root privileges
    printf("Error:wiringPi must be run as root.\n");
    return 1;
  }
  if (wiringPiSetup() == -1) {
    printf("Error:wiringPi setup failed.\n");
    return 1;
  }
  pinMode(HARD_PWM_PIN, PWM_OUTPUT); // setup hardware pwm
  softPwmCreate(SOFT_PWM_PIN, 0, 100); // setup software pwm pin
  int up;
  int down = kMaxVal;
  while (1) {
    for (up = 1; up = 5; down--) {
      if (down < 0) {
        down = kMaxVal;
      }
      if (down > kMaxVal) {
        down = kMaxVal;
      }
      pwmWrite(HARD_PWM_PIN, down);
      softPwmWrite(SOFT_PWM_PIN, down);
      delay(DELAY_MS * 2);
    }
    delay(DELAY_MS * 5);
  }
}
void control_event(int sig)
{
  printf("\b\bExiting...\n");
  pwmWrite(HARD_PWM_PIN, 0);
  softPwmWrite(SOFT_PWM_PIN, 0);
  delay(100); // wait a little for the pwm to finish write
  exit(0);
}

これを実行するとわかるが、ハードウェアによる PWM 出力の LED がソフトウェアのそれと比べて暗い。
調べると、ハードウェアは0〜1023の値をとることができるが、ソフトウェアは0〜99となっている。
このプログラムでは、ソフトもハードも99までとしているので、ソフトは最大値までいっているが、ハードによる PWM は 1/10 程度の値にしかなっていない。
そのため、ハードウェアによる PWM 生成の LED は暗く見えている。
ソフトウェアによる PWM は「softPwmCreate(SOFT_PWM_PIN, 0, 100);」により初期化している。この中で初期値(最小値?)を0、レンジを100にしている。
レンジが100ということで、とりうる値は0〜99でしょう。100はとりえない。
なので、「softPwmCreate(SOFT_PWM_PIN, 0, 1024);」と、100を1024にしてしまうだけでいけちゃう? 周期が長くなってしまう?


Better PWM on the Raspberry Pi では、DMA を使った PWM 生成を考えている。
ここでは、DMA を使って、8ch で 2000 ステップの PWM 出力を CPU パワーをほとんど使わずに生成していると記述されている。サンプルコードは無いけれど。
ほかには・・・
RPIO.PWM: Precise PWM via DMA for servos and more (1µs res) ここも Python ラッパあり。

PWM via DMA for the Raspberry Pi Python で DMA PWM。
Raspberry Pi PWM via DMA ここはよくわからない。


というわけで、RPIO のインストール。「python-setuptools」をインストール済みであれば1行目は不要。
$ sudo apt-get install python-setuptools
$ sudo easy_install -U RPIO
でも、これって python 動かすのに root 権限が必要?

easy_install ではなく、ソースからインストールする場合はこれ。
$ git clone https://github.com/metachris/RPIO.git
$ cd RPIO
$ sudo python setup.py install
そのあと、python インタプリタを立ち上げて・・・
$ sudo python
>>> from RPIO import PWM
>>> servo = PWM.Servo()
>>> servo.set_servo(18, 1200)
などと、する。ここで、18とあるのは GPIO の番号で、1200 とあるのはパルス幅uSec。
パルス幅は0から19990までの値をとることができる。10uSec 単位でパルス幅を決めることができる。
止めるときはこれ。
>>> servo.stop_servo(18)

ピン番号との対応表。右端の GPIO の番号で PWM のビットというかチャネルを決める。
set_servo(18, 10000) ならGPIO18で、bit 1、P1のピン12から出力されている。


bit
P1 pin
name
0
11
GPIO17
1
12
GPIO18
2
13
GPIO27
3
15
GPIO22
4
16
GPIO23
5
18
GPIO24
6
22
GPIO25
7
7
GPIO04
8
3
GPIO02
9
5
GPIO03
10
24
GPIO08
11
26
GPIO07
12
19
GPIO10
13
21
GPIO09
14
23
GPIO11
15
8
GPIO14
16
10
GPIO15


P5 pin

17
3
GPIO28
18
4
GPIO29
19
5
GPIO30
20
6
GPIO31

Python Pyramid

Python Pyramid をインストールする。

  • pip のインストール
  • $ sudo easy_install pip
    
  • Pyramidのインストール
  • virtualenvで環境を作って、そこにPyramidをインストールする。
    $ sudo pip install virtualenv
    $ sudo pip install virtualenvwrapper
    $ virtualenv --no-site-packages env_pyramid
    $ cd env_pyramid
    $ bin/pip install pyramid
    

  • Pyramid Project の作成
  • $ bin/pcreate -s starter MyProject
    
    $ cd MyProject
    $ ../bin/python setup.py develop
    $ ../bin/python setup.py test -q
    $ ../bin/pserve development.ini
    で、http://192.168.0.202:6543に表示される。
    参考にしたのはここ。
    Creating a Pyramid Project

  • 運用
  • pyramid.wsgiは、~/env_pyramid/へ。その内容はこれ。
    from pyramid.paster import get_app, setup_logging
    ini_path = '/home/pi/env_pyramid/MyProject/production.ini'
    setup_logging(ini_path)
    application = get_app(ini_path, 'main')
    

    1. mod_wsgi のインストール
      $ sudo apt-get install libapache2-mod-wsgi
      
      これをしたところ、python2.6 のモジュールがいろいろ入ってしまったので、remove する。
      $ sudo apt-get remove or autoremove ...
      libpython2.6 python2.6 python2.6-minimal
      libapache2-mod-wsgi libpython2.6 python2.6 python2.6-minimal
      

      $ sudo apt-get install libapache2-mod-wsgi
      
    2. 別の記述で mod_wsgi をインストールする
      ここに書いてある方法でやってみる。upgrade は大変時間がかかる。
      Apache and mod_wsgi on Debian 6 (Squeeze)
      $ sudo apt-get update
      $ sudo apt-get upgrade
      $ sudo apt-get install apache2 python-setuptools libapache2-mod-wsgi
      
      残念ながら、これも python2.6 をインストールしようとするのでやめる。
    3. ソースからインストールしてみる
      Download: mod_wsgi-3.4 - Source Code Archive」からソースをダウンロードする。
      $ tar xzvf mod_wsgi-3.4.tar.gz
      $ cd mod_wsgi-3.4/
      
      $ ./configure
      apxs: command not found と言われるので中止。apache2-dev をインストールしないとだめ?
    4. 最初の方法でやってみる
      $ sudo apt-get install libapache2-mod-wsgi
      $ sudo a2enmod wsgi
      
      $ sudo service apache2 reload

      config の修正をする。
      /etc/apache2/mods-available/wsgi.conf の最後の方の「</IfModule>」の手前にこれを追加する。
      WSGIApplicationGroup %{GLOBAL}
      WSGIPassAuthorization On
      WSGIDaemonProcess pyramid user=pi group=pi threads=4 \
         python-path=/home/pi/env_pyramid/lib/python2.7/site-packages
      WSGIScriptAlias /myproject /home/pi/env_pyramid/pyramid.wsgi
      
      <Directory /home/pi/env_pyramid>
        WSGIProcessGroup pyramid
        Order allow,deny
        Allow from all
      </Directory>
      

      もう一度。
      $ sudo service apache2 reload
      

      http://192.168.0.202/myproject」でPyramidの画面が表示される。


    ここも参考にした。
    Running a Pyramid Application under mod_wsgi
    modwsgi.confの内容については調べてください。

2013年5月9日木曜日

hdmi ディスプレイの設定と動画の再生

家庭用のテレビをディスプレイ代わりに使っている。
ディスプレイの設定をするコントロールパネルのようなものがあるのだが、このテレビは情報を取得できるようになっていないらしく、表示ピクセル数などを設定することができない。
Raspberry Pi は、フル HD のビデオ信号を出力しているのだが、このテレビは残念ながら1080p のフル HD には対応していない。
そのため、画面がたいへん見づらい。
ディスプレイの設定は /boot/config.txt に書かれていることがわかったので、それを修正してみる。
config.txt の最初に次の行を追加した。
disable_overscan=1
framebuffer_width=1024
framebuffer_height=768

width と height を SVGA サイズにしてみる。
rasp-config で Overscan を disable にしてあると、自動的に「disable_overscan=1」になっているはず。
これで reboot する。

次に、動画再生の実験を行う。
「/opt/vc/src/hello_pi/hello_video」に動画再生のプログラムがあるのでこれを実行してみる。
まず、/opt/vc/src/hello_pi で、libs を make しておく。
$ make -C libs/ilclient
$ make -C libs/vgfont

次に、/opt/vc/src/hello_pi/hello_video に移動して、サンプルブログラムを make して実行。
$ cd hello_video/
$ make
$ ./hello_video.bin test.h264

フル画面でアニメが表示される。config.txt の設定は無視されている。


Raspberry Pi Video Loop に書かれているループ再生をやってみる。
video.c を修正する。
<修正前>
if(!data_len)
    break;
<修正後>
if(!data_len)
    fseek(in, 0, SEEK_SET);

make して実行。
$ make
$ ./hello_video.bin test.h264

途切れなく、繰り返しアニメが表示される。

ちなみに、なぜか再生できない mp4 ファイルは、次のコマンドで変換する。
ffmpeg は、Raspberry Pi にはインストールされていない。処理に時間がかかるので、他のマシンにインストールして変換した方が良い。mac では MacPorts でインストールできる。
$ ffmpeg -i can_not_play.mp4 out.h264


起動時に、自動的に動画を再生するように設定してみる。
これも Raspberry Pi Video Loop に書かれている。
cron の @reboot マクロを使用する。
先ほどの /opt/vc/src/hello_pi/hello_video にある test.h264 を起動時に再生するように cron を設定する。
次のコマンドで cron を編集する。
$ crontab -e

これを追加する。
@reboot /opt/vc/src/hello_pi/hello_video/hello_video.bin /opt/vc/src/hello_pi/hello_video/test.h264

そして、reboot。
$ sudo reboot

起動後に、動画が再生される。

2013年5月8日水曜日

WiringPi

今回は、GPIO制御ライブラリWiringPiのインストールとその試験をする。
Python版のインストールと一緒にC版もインストールする。「Raspberry Life」を参照した。
  1. gitが無いので、インストールする
    $ sudo apt-get install git-core
  2. Python SetupTollsがインストールされていないので、それを先にインストールする
    $ sudo apt-get install python-setuptools
    
  3. python-devも必要となるので、それもインストールする
    $ sudo apt-get install python-dev
  4. WiringPiのPython版ソースをgitで取得する
    $ git clone https://github.com/WiringPi/WiringPi-Python.git
    $ cd WiringPi-Python/
    $ git submodule update --init
    
  5. この中にC版のWiringPiがあるので、これをさきにbuildしておく
    $ cd WiringPi/
    $ ./build
    $ cd ../
    
  6. WiringPi Python版のインストール
    $ sudo python setup.py install
  7. これが表示されてインストール終了
    Installed /usr/local/lib/python2.7/dist-packages/wiringpi-1.1.0-py2.7-linux-armv6l.egg
    
  8. WiringPiのC版は「PWM on Raspberry Pi」を参照

Raspberry Pi GPIO with Python (without root)のサンプルコードをそのまま動かしてみる。
実行する前にこれ。
$ gpio export 18 out
$ gpio -g mode 18 out  
$ gpio -g write 18 1

Pythonソースblink.pyはこれ。picoなどを使って作成する。
import wiringpi
from time import sleep
io = wiringpi.GPIO(wiringpi.GPIO.WPI_MODE_SYS)
io.pinMode(18,io.OUTPUT)  # Setup pin 18 (GPIO1)
while True:  
    print("Turn On")
    io.digitalWrite(18,io.HIGH)                 
    sleep(2)
    print("Turn Off")
    io.digitalWrite(18,io.LOW)            
    sleep(2)

テスターなどでP1-25(GND)とP1-12(GPIO18)の電圧を測定し、2秒ごとに0と3Vを繰り返していればOK。
つぎのようにLEDが接続されていれば点滅する。